Need a helping hand with how to migrate your WordPress site to SiteGround hosting?
In July 2018, SiteGround released this awesome new SiteGround Migrator tool that makes it super simple to migrate any WordPress site to your SiteGround hosting.
While SiteGround always offered free migrations for new users, it used to only work when you first signed up to SiteGround.
Now, you can migrate unlimited WordPress sites to SiteGround at any time.
In this post, I’ll show you exactly how you can migrate any WordPress site to SiteGround using the new SiteGround Migrator tool. This tool works with all of SiteGround’s plans, but SiteGround GrowBig users and above will get the most benefit because those plans allow unlimited websites.
Here’s your step-by-step migration guide…
Step 1: Install The Free SiteGround Migrator Plugin On The Site You Want To Migrate
To get started, go to the WordPress dashboard for the site that you want to migrate to SiteGround.
Then, install the free SiteGround Migrator plugin. This plugin is listed at WordPress.org, so you can install it straight from your WordPress dashboard:
- Go to Plugins → Add New
- Search for “SiteGround Migrator”
- Click Install Now
- After a few seconds, the Install Now button will change to Activate. Click that button again to activate the SiteGround Migrator plugin

Step 2: Generate A Migration Token From SiteGround cPanel
Next, you’ll need to generate something called a Migration Token. You can do this from your SiteGround cPanel dashboard. Here’s how to get it…
To get started, you’ll need to log in to your regular SiteGround hosting dashboard. If you aren’t already a SiteGround customer, you’ll need to sign up and pay for hosting first. I recommend the GrowBig plan.
Once you’re a SiteGround customer, click the Login button to access your account:

Log in to your account using your email and password.
Once you’re logged in, click on the My Accounts tab:

Then, click on the red Go to cPanel button to access your cPanel dashboard:

Once you’re in cPanel, scroll down to the WordPress Tools section and look for the WordPress Migrator option:

When you click WordPress Migrator, it will take you to a new page where you can generate your token.
First, select the domain you want to migrate your site to from the Select Domain drop-down.
This drop-down will list all of the domains that you’ve added to your SiteGround account. If you don’t see your domain name, you’ll need to add it as an Addon Domain first, which you can also do from cPanel (this tutorial shows you how).
Once you’ve selected your domain name, click the big Generate button:

Then, you’ll see a popup with a weird looking string of characters. Copy this string of characters or otherwise keep it handy because you’ll need it in the next step.

Also, make sure you don’t share this token with strangers…though I’m not sure why you’d want to!
Step 3: Add Migration Token To The Plugin
Now, go back to the WordPress dashboard for the site you want to migrate and click on the SG Migrator option in your WordPress dashboard sidebar.
Then, paste the migration token from the previous step into the Migration Token box.
If you want to receive an email when the migration is finished, you can also add your email.
Then, go ahead and click the Initiate Transfer button:

Now, you just need to wait for SiteGround to work its magic…

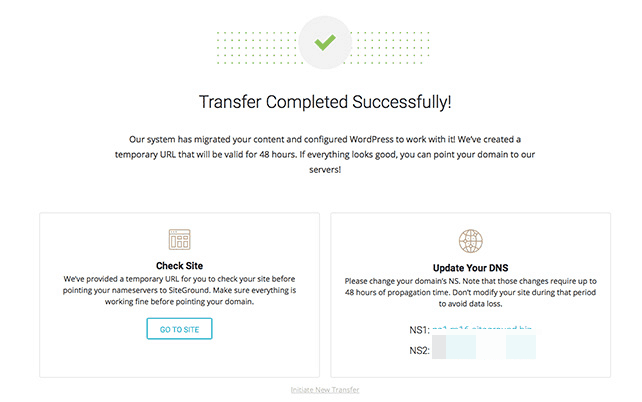
And once it finishes, you should see a success message:

SiteGround will create a temporary URL where you can test your site by clicking on the Go To Site button.
Step 4: Update Your DNS Records
At this point, all of your site’s files have been successfully migrated to SiteGround. Now, all you need to do is change your domain name’s nameservers so that they point towards SiteGround hosting instead of wherever you previously hosted your site.
This process varies depending on where you purchased your domain name, so I unfortunately can’t give you detailed instructions.
You can see the nameservers that you need to point to in the Update Your DNS section of the SiteGround Migrator success screen. And you can consult your domain registrar’s support documentation for how to change nameservers. Here are some links to help articles for popular domain registrars to get you started:
Enjoy Easy SiteGround WordPress Site Migrations
All in all, I’m really excited about this new tool from SiteGround. It makes it simple to migrate a WordPress site to SiteGround at any time, which comes in especially handy if you’re like me and are always working on different WordPress sites.
In the end, it’s just one more reason I’m a happy SiteGround customer!
Do you have any other questions about migrating your WordPress site with the new SiteGround Migrator plugin? Leave a comment and I’ll try to help out!
Colin Newcomer is a freelance writer for hire with a background in SEO and affiliate marketing. He helps clients grow their web visibility by writing primarily about digital marketing, WordPress, and B2B topics.

